Chalk painted furniture and home decor is all the craze! Anywhere you look, you see the warm, well-loved, distressed charm in home decor finishes. And as you look around, you can also find these painted pieces with hefty price tags attached!
Well, I am happy to tell you that you too can achieve these desired, cherished finishes without paying those high price tags. Look around your home. Do you have a piece of furniture that needs a little TLC? What about that thrift store or garage sale find that has been sitting in the garage/storage just waiting for the right inspiration? Let me show you just how easy it is to paint and distress a discarded frame using FolkArt Home Decor Chalk. It truly is easy and you will love the finished results!
Believe it or not, I "found" this frame with a "FREE" sign on it while driving through an area neighborhood! I immediately discarded the print and its mat and kept the glass for another project. The frame was yearning to be FolkArt Home Decor Chalk painted and distressed while the backing board would become a chalkboard surface. I could envision this framed piece in my kitchen perfect for menus, announcements or simple messages and notes. Follow along with me and I'll show you what I did every step of the way ....

Let's gather the necessary supplies ....
- Discarded Frame with detailed molding
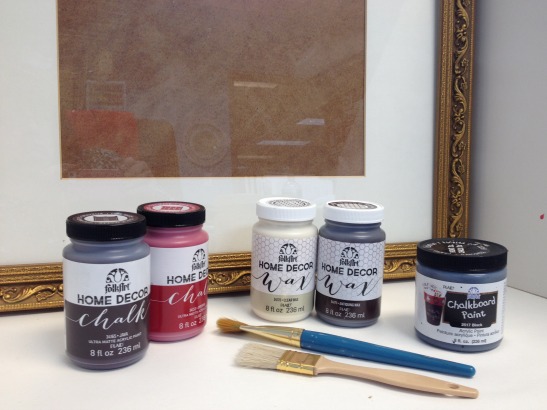
- FolkArt Home Decor Chalk -- Java and Imperial
- FolkArt Home Decor Clear Wax
- FolkArt Home Decor Antiquing Wax
- Brush
- Lint-free Cloth
- Medium Grit Sandpaper
- White Chalk
- Window Cleaner
- Paper Towels

The first thing I did was remove the print, mat and glass from the frame and its masonite backing. I then wiped down the frame with a window cleaner moistened paper towel. When painting with FolkArt Home Decor Chalk paint, there is NO prep required ... NO sanding, NO priming, NO striping ... all you need to do is clean the surface to remove any dust or dirt. Amazing!
I wanted you to see the detail up close of the molding of my frame. It is so pretty. I chose two colors for my project, Java (a rich warm brown) and Imperial (a delicious royal red). I enjoy many red accents in my vintage styled kitchen so I knew these would be a wise choice for my project.
When painting with FolkArt Home Decor Chalk paint, a distress finish can be achieved using only one color or with multiple colors. NOTE: FolkArt Home Decor Chalk paint is currently available in a variety of 16 colors and two waxes and I believe you will find many pleasing color combinations. And to help you plan your project ... each 8 oz jar will cover approximately 20 sq. ft.

After opening the jar, I stirred the paint to fully incorporate. Using a bristle brush, I painted the entire frame with Java and allowed it to dry. When painting with FolkArt Home Decor Chalk paint, you will notice that it is very heavily pigmented which means you will most likely cover your surface in one application. However, if desired a second coat can be applied 2 hours after the first application. It is important to allow proper drying time between paint applications.

After the Java application was fully dried, I added a coat of Imperial paint. I LOVE the color, don't you? It is so rich and vibrant! Allow the Imperial to dry two hours.

Once the Imperial coat was thoroughly dried, I began distressing the surface and sides of the frame using a medium grit sandpaper. The beauty of FolkArt Home Decor Chalk paint is that it will sand easily without "gumming" up the sandpaper. Depending on the desired effect, you can sand heavily for a well-worn look or very lightly for a slightly used look.

I chose to sand to distress so that both the Java and the initial gold finish would show through the worn Imperial paint.

Remember how I said the FolkArt Home Decor Chalk paint would sand nicely? Well, here is a quick pic of how the paint will sand to a fine powder. Looking closely, you can see powder residue of both Java and Imperial. This is why your sandpaper will not get "gummed" up! You will also be able to sand without using a tremendous amount of elbow grease! LOVE it!!

The next step is to make sure all the powder is wiped from the project surface. I used a paper towel along with a dry bristle brush to get into the detail crevices of the molding to remove the sanding powder.
Once clean, I then brushed on a coat of FolkArt Home Decor Clear Wax and allowed it to dry 1 hour. The Clear Wax will provide a protective finish to the distressed chalk painted surface. It also will act as a sealer before applying FolkArt Home Decor Antiquing Wax. TIP: You will notice a "wet sheen" when first applied, however, as it dries, it will become more matte.

If this is your final step, (no desire to create an antiqued finish), after an hour dry time, you will be ready to buff to desired sheen to complete your project. Using a lint-free cloth rub over the surface. The more you rub, the higher the sheen. You can reach the desired finish by buffing to the desired sheen.

I did choose to create an antiqued finish to my molded frame, so after buffing, I brushed on a coat of FolkArt Home Decor Antiquing Wax.

TIP: While working with FolkArt Home Decor Antiquing Wax, I find it easier to work a smaller section at a time, therefore, I antiqued one side of the frame before working the next side of the frame. Simply apply FolkArt Home Decor Antiquing Wax making sure you apply it over the entire surface including the detail grooves. While still wet, begin wiping to remove excess. TIP: You can achieve more "Old World" charm by allowing some of the antiquing wax to remain in the details of the molding. Experiment with this step, sometimes, I like to use my lint-free cloth to apply and wipe off the antiquing wax.

Look at how pretty! FolkArt Home Decor Antiquing Wax is the rich, warm brown you want to give your projects to achieve the time-worn look of years gone by. And lastly, I buffed the frame one more time after the antiquing wax was thoroughly dry.

During some of the drying time on my frame project, I also worked on the backing board creating a painted chalkboard surface. I recommend painting two to three coats of FolkArt Chalkboard Black paint onto the masonite backing board that came with my frame. I did allow drying time between applications as well as after the final coat.
And like I have mentioned in previous chalkboard painted projects, all painted chalkboard surfaces MUST be conditioned prior to chalking a message. Why you ask? If a painted chalkboard surfaces is not conditioned prior to writing a message, a "ghost" of what is first written will always remain. So ... to condition my dry painted chalkboard surface, I chalked over the entire surface; then wiped it clean with a paper towel.

Next, is the fun part of chalking my message!

Then assemble the chalkboard painted backing into the FolkArt Home Decor Chalk painted, distressed, and antique waxed frame. Voila .... a fabulous new message board for my kitchen. Tell me ... do you LOVE it too?

You will find additional FolkArt Home Decor Chalk projects, inspiration, and FAQs on plaidonline.com!
For more easy and awesome DIY projects, craft tips and tricks, updates on the latest trends, be sure to subscribe to the our newsletter!