Do you follow Pinterest for project inspiration? Are you creatively inspired by looking through DIY home décor magazines? I LOVE Pinterest and following inspirational DIY magazines! If you are like me, I am sure you have seen all the fabulous chalkboard surfaces such as walls, furniture, frames, trays,even mason jars!
Along with the unique chalkboard surfaces, I am sure you have seen and perhaps even envied the gorgeous chalkboard lettering. I sure wish I was able to write on a chalkboard like that! Well, now we all can! Yes, Martha Stewart Crafts did it once again!!
I am happy to share with you Martha Stewart Crafts Erasable Liquid Chalk and Adhesive Silkscreens designed for chalkboard decorating. The Adhesive Silkscreens come in four different packages, three alphabets and one words and phrases: Bodoni Alphabet, Carolyna Alphabet, Striped Alphabet and Phrases!
Let's gather a few supplies and I'll show you just how simple and easy it is ... promise ... you will LOVE it!
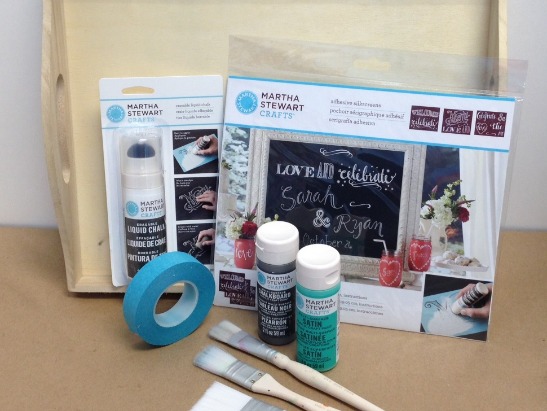
Supply List:
Wood Serving Tray (an interesting chalkboard surface, perfect for the kitchen wall! I got mine at Jo-Ann Fabric and Craft Stores)
Martha Stewart Crafts Multi-Surface Chalkboard Paint - Arrowhead
Martha Stewart Crafts Adhesive Silkscreens - Phrases
Martha Stewart Crafts Erasable Liquid Chalk
Martha Stewart Crafts Multi-Surface Satin Paint - Diving Board
Martha Stewart Crafts Stencil Tape
Martha Stewart Crafts Utility Brushes or 3/4" Flat Brush
Miscellaneous Supplies: Brush Basin or container for water, Paper Towels, Small Foam Plates, Medium Grit Sandpaper, White Chalk, Sea Sponge
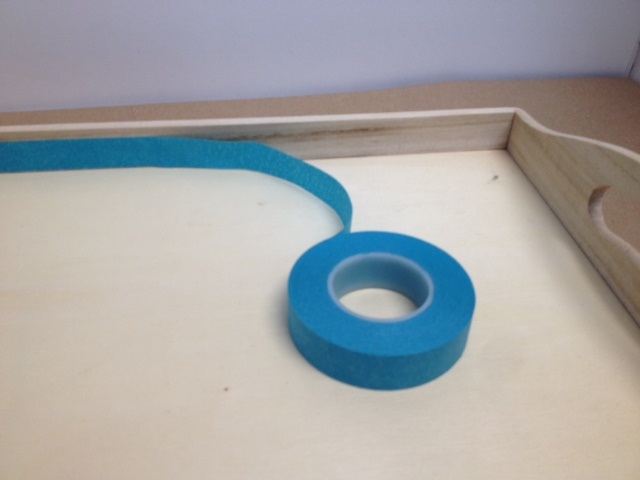
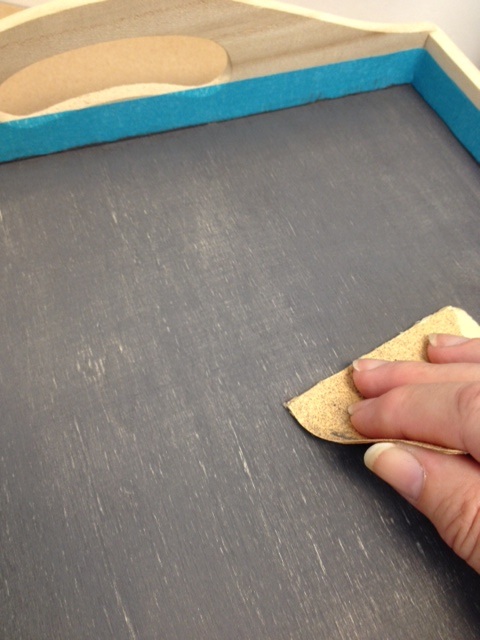
The first thing I did was prepare the tray to be painted. I chose to paint the inside bottom of the tray with the chalkboard paint. NOTE: Perfect tip for beginners ... make it easy ...take a minute to apply stencil tape to the inside edge of the tray sides. This will help keep the chalkboard paint on the bottom of the tray and not ride up the edges onto the sides.
I chose Arrowhead a rich, warm, medium gray as my chalkboard paint color which will make my chalkboard surface just slightly different from the "everyday" chalkboard look of "black." Colored chalkboards are fun! Have you seen all the new colors of Martha Stewart Crafts Chalkboard Paint currently at Jo-Ann? These Martha Stewart Crafts 2 oz. Black, Gray, Arrowhead, Ink, and Oxblood chalkboard colors are currently available at Jo-Ann and plaidonline.com. Using a Martha Stewart Crafts Utility Brush, I painted the inside tray base with Arrowhead. Allowed to dry. I then cleaned my brush with soap and water!
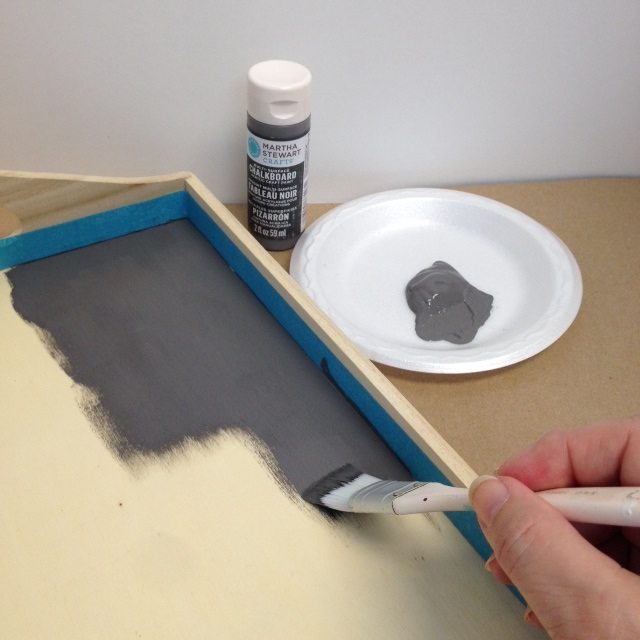
The first application of chalkboard paint dried quickly and like most paint on raw wood surfaces, it raised the grain of the wood a bit. I wanted my chalkboard surface to be smooth so I used medium grit sandpaper and sanded the surface to remove the rough feel. I then added a second coat of Arrowhead Chalkboard paint and allowed it to dry. Then I removed the stencil tape.
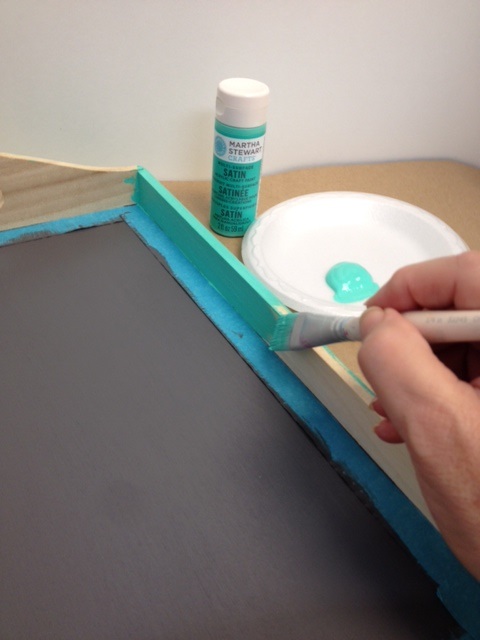
When the chalkboard surface was dry, I reapplied the stencil tape inside the tray bottom on the painted chalkboard surface in preparation of painting the remaining areas of the tray. I chose a new Martha Stewart Crafts Satin paint color -- Diving Board! Doesn't it look like a fun summertime color? I LOVE how it reminds me of a beach cabana! Actually, there are ten new Martha Stewart Satin paint colors available at Jo-Ann, check them out -- Periwinkle, Peacock Feather, Snow Pea, Mermaid Teal, Diving Board, Slate Gray and four fabulous Neons: Date Night Pink, Lightning Bug, Orange Soda, Lime Zinger! Using a 3/4" flat brush or the same utility brush, apply one coat of paint on all the remaining areas. Allow to dry; sand smooth and reapply Diving Board.
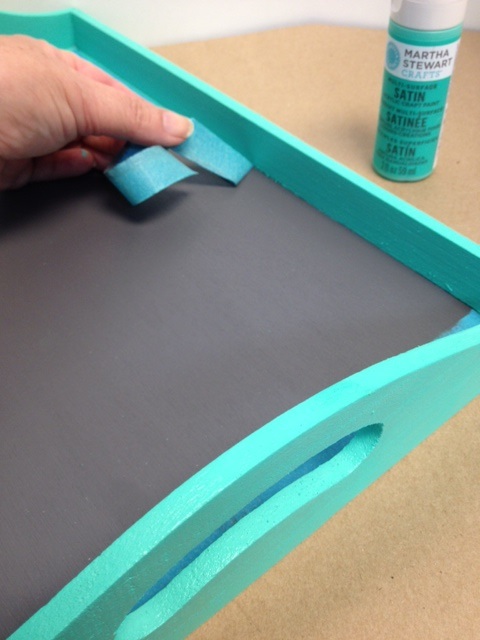
Once Diving Board is completely dry, peel stencil tape to reveal a clean painted edge. Using the tape trick makes straight paint lines so much easier .. no mess ... no over-paint lines to clean!
As with all chalkboard painted surfaces, the chalkboard must be conditioned before using. To condition rub a piece of white chalk all over the painted chalkboard areas.
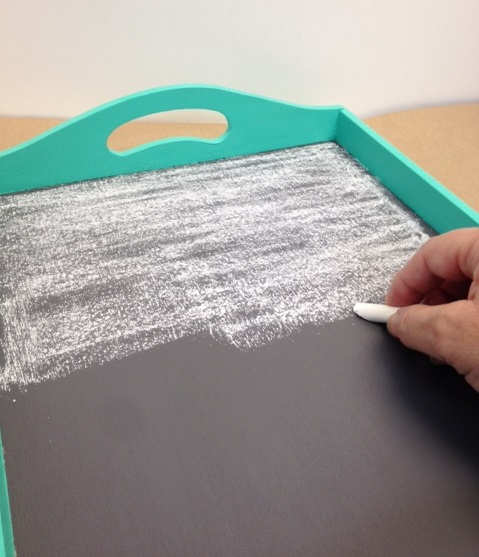
Next, wipe over the chalked area with a paper towel. That's all there is to conditioning a painted chalkboard!
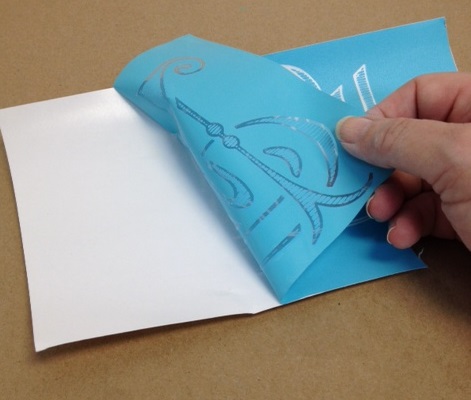
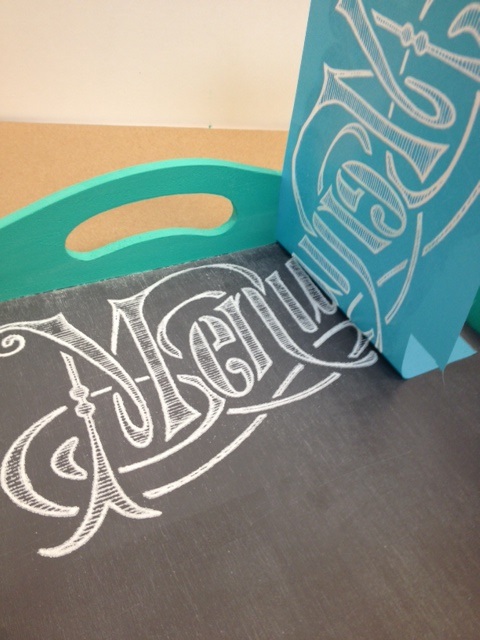
Now that my surface is prepared ... time for fun, eh? Martha Stewart Crafts Silkscreens are fun for crafters of all ages. Each and every time, you achieve professional looking results! Begin by peeling the adhesive silkscreen from the backing sheet. NOTE: Keep the backing sheet so that you can store your silkscreen when not is use. I then positioned the adhesive silkscreen at the top center of my chalkboard tray. Press in place. There is no need to tape it down or use adhesive sprays like when stenciling. NOTE: If desired, you may wish to apply a piece of tape along the edge if the silkscreen design is close to the edge (example: the bottom of "M" is close to the cut edge of the silkscreen). Adding a piece of tape will aid in protecting your crafting surface.
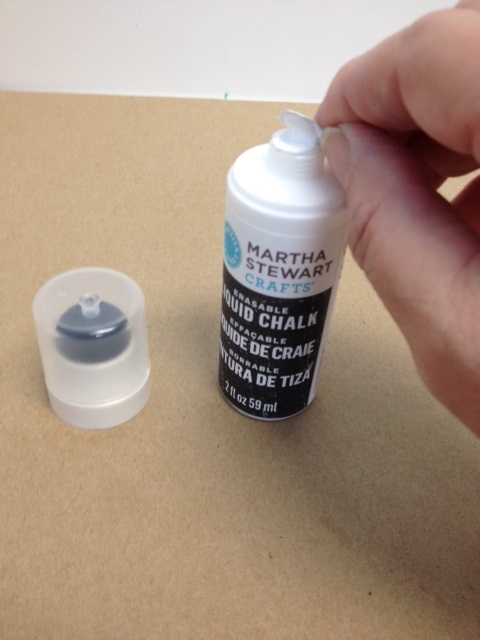
I then removed the cap and lid to the Martha Stewart Crafts Erasable Liquid Chalk. You can see in the pic below that I then removed the protective heat seal. Next, replace the domed sponge topped lid.
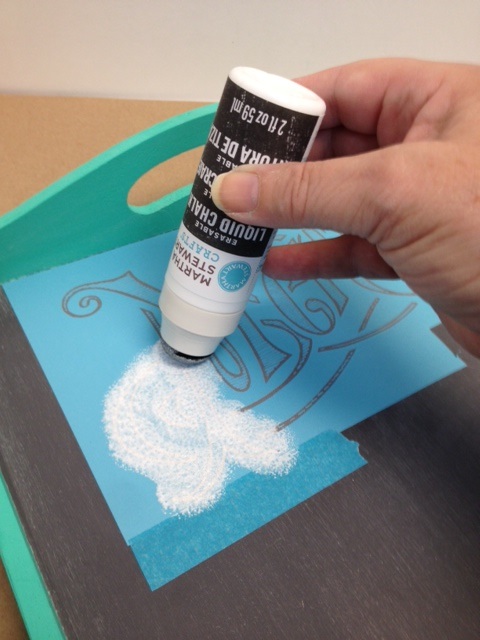
Now the cool thing about this product is that it may look like white paint, but it is far from simple white paint. It is exactly what the label says, "Erasable Liquid Chalk" and applicator in one! The domed sponge top makes application fun and easy. Simply turn the bottle upside down and tap it on a paper towel a few times to allow the Erasable Liquid Chalk to flow down into the sponge applicator. Next, touch the silkscreen openings; begin dabbing the bottle and applicator to fully cover all openings. This is quickly accomplished. NOTE: Before removing the silkscreen, take a look at the entire design making sure all design areas are fully covered.
When you are satisfied that you painted all of the silkscreen, carefully lift to remove it and at the same time reveal your masterpiece! Isn't that cool? Looks like a professional chalk master created it! NOTE: Rinse the used silkscreen in the sink under running water, Erasable Liquid Chalk will clean easily from the silkscreen while still wet.
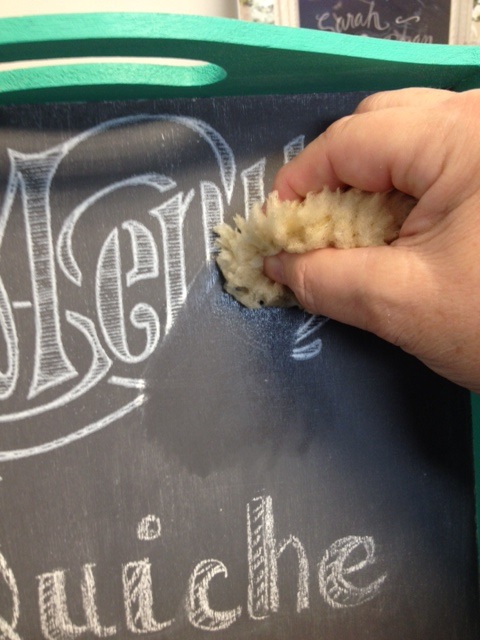
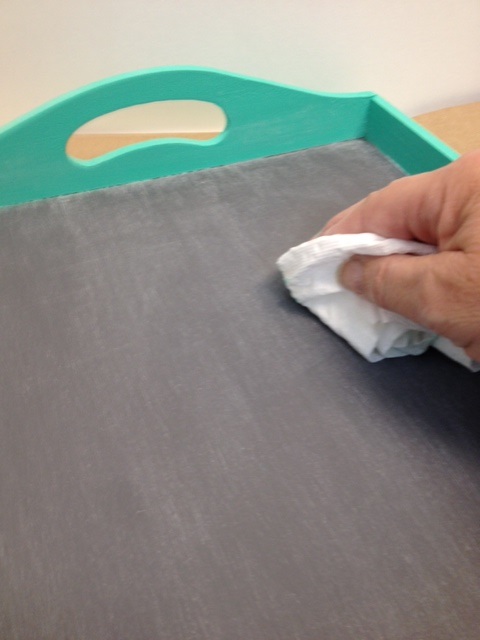
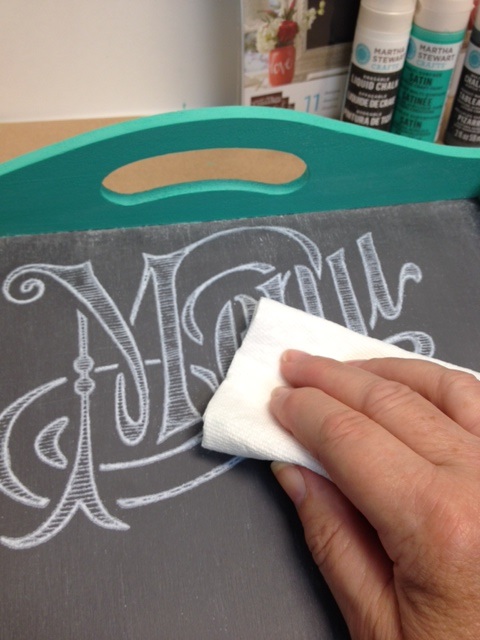
Yes, this is liquid chalk, but NO ... it will not smudge when dry! How cool is that? Pretty cool, I'd say! In the pic below, I am wiping over the "Menu" after silkscreened.
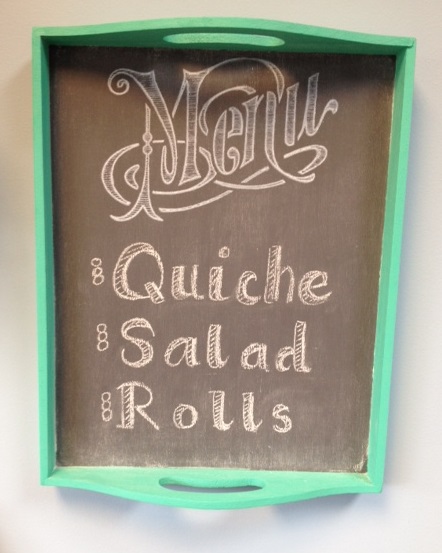
Now have fun with a stick of chalk to write your menu of the day! "Quiche, salad and rolls" where chalked by hand by me and I do not claim to be a chalk master! (However, remember I mentioned that there are also three different alphabet adhesive silkscreens? It would be easy to use one to complete the project!) When I need to use the "Menu" tray board for another meal or party, all I need to do is simply wipe over my chalked message and rewrite a new one. And using the tray as a chalkboard surface is neat because I can hang it on a kitchen wall while resting my chalk inside the tray sides.
Now you may be wondering ... why is it called "Erasable" Liquid Chalk? You saw that I tried to wipe over the silkscreened designs with a dry paper towel earlier ... and it did not smudge! Well, the secret is a damp sponge. When you want to make a change from "Menu" to another message like: "Celebrate" or "Welcome" or "Congrats," dampen a sponge and wipe over the painted silkscreen design. NOTE: I used a dampened sea sponge. It works beautifully and your painted chalkboard can be personalized many times over for any occasion! Are you sold? Want to make a chalkboard project using Martha Stewart Crafts Erasable Liquid Chalk? You too will LOVE this product! I'd love to see photos of your projects!