Many of my friends know that I enjoy gardening. My flower gardens and porches are home to pots of blooming flowers. Many of those containers are clay pots (terra cotta) that are hand painted. Today I want to share what I know about painting clay pots and how to prepare them.
Did you know that terra cotta means "baked earth?" Terra cotta is hard reddish-brown clay which has been used as a building material as well as a decorative arts substance since ancient times. Terra cotta colors may vary and it can be glazed to provide extra color and durability.
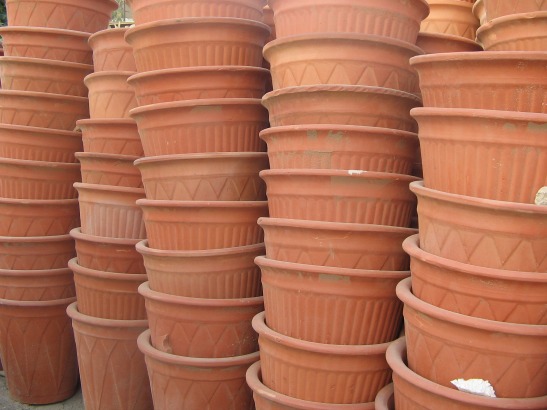
Today, when crafters think of terra cotta as a surface, they think of clay flower pots of all sizes and shapes. It is a fabulous surface for a variety of art forms such as simple or more detailed painting, stenciling, decoupage and mixed media. Clay pots are smooth offering the perfect crafting surface for all ages!
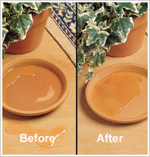
Surface Preparation -- Let's talk about "new" terra cotta. Clay pots found in craft stores, garden shops, and DIY home improvement stores are unglazed and porous meaning they are not waterproof. Unglazed or unsealed terra cotta will draw moisture from the plant and soil keeping the pot moist. Extra moisture may affect the external decoration allowing paint to blister if not properly sealed.
The first step in preparing new clay flower pots is to wipe away dust or dirt. The second step is to carefully seal both the inside and outside. Not only will this help your decorated design on the outside of the pot resist blistering, it will also help the interior to keep moisture in the soil. I can recommend two different sealing techniques:
1. Spray seal the entire pot, inside and out with a couple coats of Clay Pot Sealer. Allow each application to dry before applying the next.
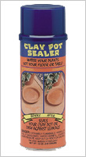
This one-of-a-kind sealer lets you water your plants and not your floor! Simply spray your clay pots and saucers. Clay Pot Sealer is available as a 12 oz. aerosol and can be located in many craft stores or at plaidonline.com.
2. The second method I recommend is to apply FolkArt Outdoor Sealer over the entire surface. For extra protection, apply a second coat on the interior walls of your pot to help create a waterproof barrier to protect your exterior decoration.

This polyurethane based sealer will provide the maximum durability for outdoor projects. It is available as a brush-on sealer in three finishes; Matte, Satin, and Gloss; and can be found in craft stores as well as at plaidonline.com.
Now comes the fun part, right? If your terra cotta will be used outdoors, I recommend using either FolkArt Outdoor or FolkArt Multi-Surface paints. Both paint formulas deliver rich color and coverage in a very creamy consistency making it easy to brush onto your clay flower pots. Both formulas were also created to be weather resistant, tested for UV protection, dry to a satin finish and cure to the surface within 48 hours. Best part .... there is no need to apply a sealer or varnish over the completed design because the paint is self-sealing. However, if you would like to give your artwork an extra layer of protection to keep it mar or scratch resistant, you can apply a coat of FolkArt Outdoor Sealer once the paint is completely cured.
When it comes to design ... there are so many options. Painted designs can be very simple from polka dots and stripes and using stencils to very elaborate hand painted floral and leaf designs. Visit plaidonline.com for awesome inspiration!
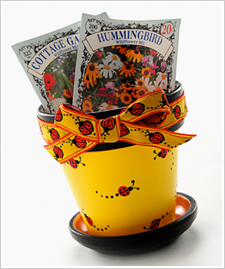
Let me now share with you a few clay pot inspiration projects that can be found on plaidonline.com. This first ladybug clay pot project was created for beginners. The ribbon tied around the band was the inspiration for both the color palette and painted design. The lady bug body can be painted using the handle end of a paint brush, a dauber, a spouncer or even a small circle stencil!
When choosing how to decorate clay flower pots, keep in mind that stencils are also great fun! This painted clay pot was created using FolkArt Ditsy Floral Stencil, isn't it super cute? And so easy to do using just two colors of paint!

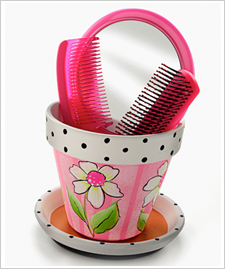
The next two projects I want to share with you are good examples of how you can use clay pots indoors as storage containers. The Girls Flower Pot was painted using FolkArt Acrylics in a "girly" color palette of pinks and greens accented with black and white! It would be adorable on the bathroom counter to contain her comb and brush!
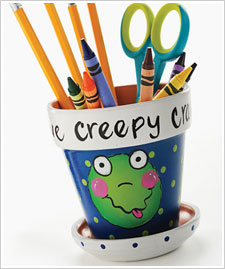
Boys Love Creepy Crawly Things also painted with FolkArt Acrylics would be an awesome desktop storage container for his pencils, crayons and scissors!
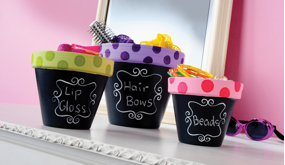
One more clay pot project I would love to share with you uses FolkArt Chalkboard Paint combined with FolkArt Acrylics. When using Chalkboard Paint, almost any surface becomes a chalkboard! And here, this trio of terra cotta pots become yet another interesting indoor storage container which can be used in any room depending how how they are labeled.
These inspirations have all used "new" terra cotta. If you would like to repurpose "old or used" terra cotta pots, be sure to thoroughly clean them before sealing and decorating. Thoroughly remove dirt and salt residue, if needed scrub the surface with a wire brush. Once clean, soak used terra cotta in a solution of 9 parts water to 1 part bleach for 24 hours. This will kill lingering bacteria. Thoroughly rinse with clean water after soaking and allow to complete dry. Follow by sealing your terra cotta pot before decorating.
I hope you have enjoyed this little terra cotta / clay pot 101 jam fest!! I always LOVE sharing tips and techniques as well as inspiration with you. I hope you do try decorating some terra cotta pots filled with gorgeous flowers for your porches and gardens. You will thank me for it!