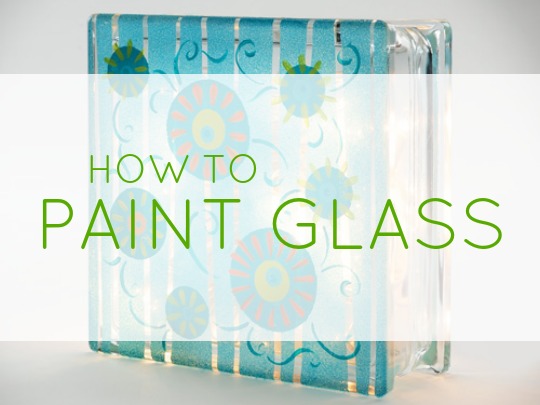
 Painting on glass is not only fun, but it can be very easy especially for beginners! There never is a shortage of glass items to paint; just look around your home, shop your favorite retail stores, or bargain hunt at your local thrift stores. You are bound to locate glasses, plates, bowls and vases that need a little painted pizzazz! Today I want to share with you preparation tips, painting ideas, and important curing and care instructions when using glass as a crafting surface; so let’s get started . . .
Surface Preparation:
Before you squeeze the first drop of paint or lift a brush, prepare your glass. Thoroughly wash in warm, soapy water to remove dirt, dust, and grease film, then rinse in warm water and allow to dry.
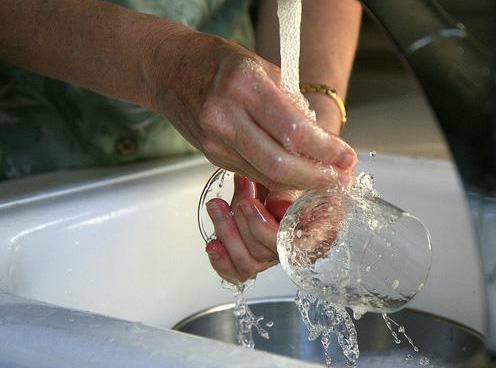
Next, dampen a paper towel with rubbing alcohol or white vinegar and wipe stemware to remove any remaining soap film. Set aside for 15 minutes to air dry.
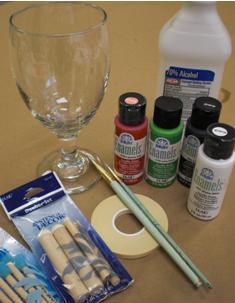
When painting glass, I sometimes use FolkArt Enamels; a waterbase paint that is formulated for glass painting. Other times, I use FolkArt Multi-Surface Paints which are developed for use on many different types of surfaces including glassware. Both paint formulas are available in many colors at craft stores and plaidonline.com and are made in the USA! When cured, glass projects are top-shelf dishwasher safe.
Supplies:
FolkArt Enamels: OR FolkArt Multi-Surface:
Wicker White Wicker White
Pure Orange Pure Orange
School Bus Yellow Moon Yellow
Licorice Licorice
Lipstick Red Engine Red
Lime Green Lime Green
(NOTE: This project was painted using FolkArt Enamels)
Miscellaneous: clean stemware, foam plate, brush basin, paper towels, soft bristle brushes, daubers, rubbing alcohol, and stencil tape. Optional items: tracing paper pattern, old sock, foam spouncers craft knife, and stylus.
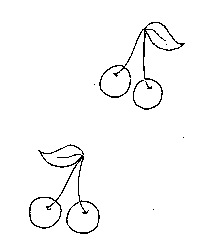
One style of glass painting is the One Stroke method by Donna Dewberry as shown here.
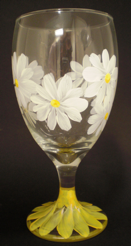
Other free-hand styles include polka dots using the handle end of a paintbrush, foam daubers and spouncers or painted stripes using a flat brush or stencil tape to mask various widths.
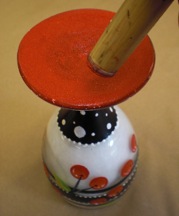
The traditional method of tracing and transferring a pattern does not always work well on glass as it is hard to see. TIP: Place your pattern inside the bowl of the wine stem and tape in place. If a pattern is repeated around the glass, secure several patterns. Voila, you can now see the pattern through the glass!
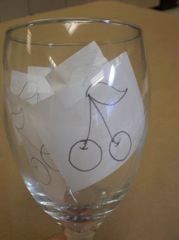
TIP: Another helpful hint …place your pattern inside the glass, then fill the glass stem with soft fabric (an old sock, quilt batting, etc.) which will keep the pattern close to the glass ready for painting. You also will not be distracted looking through the glass at the painted sections on the opposite side of the glass. Neat tip, eh?
Painting Suggestions:
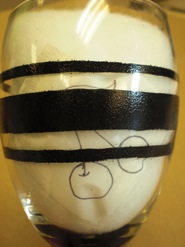
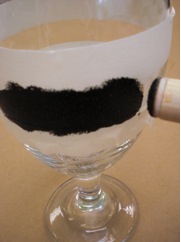
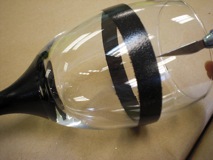
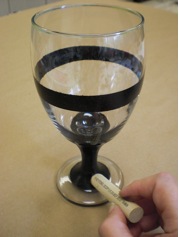
Stripes: Painted stripes are easy and can create interesting backgrounds. Stripes can be painted free-hand or you can use stencil tape to mask an area to be painted. Paint can be applied using a flat brush, dauber, or spouncer. While wet, carefully remove tape. Caution: It is best NOT to allow paint to dry with tape in place as paint may be lifted when tape is removed later. TIP: If allowed to dry with the tape in place, you can score along a tape line before removing the tape using a craft knife. Also a fuzzy paint edge can be cleaned using your craft knife when paint is dry.
You can also use a dauber to paint the stem free hand.
Polka Dots: Painting polka dots is fun; especially easy for beginners. They can be painted using a dauber (or spouncer); load with paint, tap on palette, reload, and paint dots!
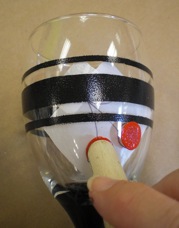
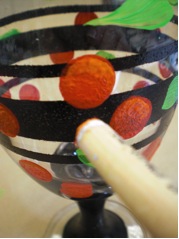
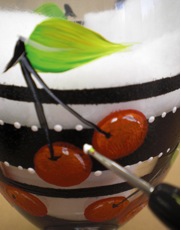
You can highlight by adding a second color, see the application of orange on top of the red cherry? Using a flat brush, add a few leaves.
The underside of the wine stem base is painted a splash of red using a dauber… keeping it easy.
A liner brush with black will complete the cherry stems. Borders of small white dots are painted using the brush handle or a stylus. Simply dip into a “fresh” puddle of paint and touch the surface. Reload for same-sized dots. Paint descending sized dots with one load; simply continue dotting until all paint has been removed from the dotting tool. Using a liner brush, add a small white dot and dash on each cherry to highlight.
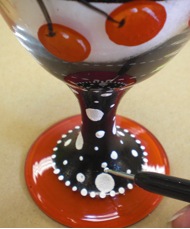
TIP: Be sure when painting dots you carefully set your tool down straight and lift straight up. If lifted at an angle, painted dots will smear. Try this tip: once your dotting tool is loaded, touch the surface, carefully twist in a circular motion, then lift to remove. The extra twist will ensure a full even circle.
Drying Times: Glassware should be thoroughly dry before handling, at least 24 hours.
Curing Instructions: Both paint formulas, FolkArt Enamels and FolkArt Multi-Surface Paints should be cured prior to using; there are two recommended methods:
Air Dry Method: Air dry the project for 21 days before using.
Bake Method: Place your painted glassware in a cool oven. Set the oven temperature to 350ºF and bake for 30 minutes. Note: Glass must heat gradually with the oven to avoid breakage; DO NOT preheat. Turn the oven off after 30 minutes; let the glass cool completely in the oven. Painted glass should both heat up and cool down in the oven. Set aside for 72 hours.
Care Instructions:
Once your painted stemware has been cured, it can be hand washed in mild soap and water or dishwasher cleaned on top shelf.
Painting on Glass Important Facts:
1. Food and beverages should not come in contact with the paint. When painting glasses, it is best to leave 3/4” top around the rim free of paint. When painting plates, only paint the rim leaving the center free of paint or reverse glass paint if artwork is desired in the center of the plate.
2. Painted glassware is not microwaveable.
3. Do not soak painted items in water.
Wasn’t this easy and a fun how-to project? If you can hold a dauber, a stylus, and a flat brush, you can paint this glass, I promise! Want to create more cherry painted glassware? Visit our website to see this project!